Monday, August 31, 2009

Kota Kinabalu Bird Sanctuary

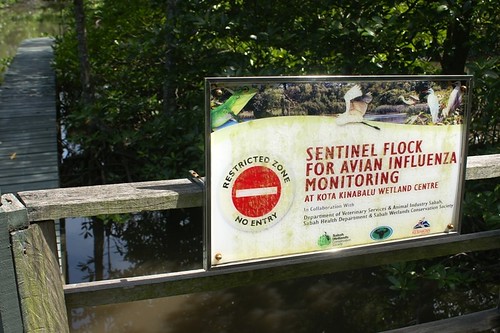
Before I went back to Bau, I visited this place which is located in Likas, not far from the Likas Square building. It's a place where birds are free to roam, look for food and also shelter. Paid RM3.00 and I went in, hoping to spot some nice birds along the way.

Sadly, I couldn't find much, maybe my eyes aren't sensitive enough or the timing is not that right that day(afternoon). When I went there in 2000, I saw quite a few of them but no camera to capture. Nevertheless, enjoy the photos of the place. And don't forget to visit, who knows you have more luck than mine. :D


Eventually, you can also shoot this 'bird' here. Easier to spot than other birds. :p


Saturday, August 29, 2009

Fairy Cave, Bau, Sarawak

Phew! It's been more than a week since I last updated this blog. I have been busy arranging my big day preparations, went back to Bau for a while, having some fun outings and stuffs and met new friends. So, I compiled everything up, and will present them here in stages, starting with this trip I had when I'm at Bau last Sunday.


I can't remember when was the last time I visited this cave. I think when I'm still in primary school. It isn't that far from where I'm staying actually, just that it gives me the creep if I'm going alone. Luckily, for this trip I was accompanied by my other half, Burney and Kenny which I got to know just recently.

From what I was told last time, the cave got its name because some of the stones there looks like structures of humans. There was a story that some humans were cursed into stones. The cave itself is located at Krokong, Bau. You just can't miss the signboard if you're driving.


Looks scary to me. Gone were the old pathways going up to the cave, now it is replaced with a sturdier, bigger and safer stairs.


The new staircase going to the entrance of the cave.


Burney.


Kenny.


Missus giving a pose at the entrance.

A torchlight helps a lot when you enter the cave as it can be quite dark depending on the weather outside. Besides, there are a few other caves inside the cave which you can explore too. It tooks us merely 10 minutes to reach the cavity of the cave, and man it's huge! It was damp but quite airy inside.


The cement stairs going to other parts of the cave.


Torchlight where are you?


Can you spot Kenny and Burney?


Rock-climbing enthusiast often come here.

I just couldn't help wondering how come I never had any plans before to go to this place earlier. It is a nice place to relax and to enjoy the nature.

Tuesday, August 18, 2009

Lunch at TNGC, Beverly Hills, Sabah


It has been some time since I patron this place. Apart from the restaurant, you can basically go karaoke on the first floor, and those with extra budget may go for the slot machines area. The whole place seems like it's still under renovation. And I saw some nice and refreshing decors at the restaurant. Really provides some nice and enjoyable dining experience. And some photo taking opportunities too. :D


Rendang with rice


Orange juice.

Friday, August 14, 2009

My DIY diffuser


Those are some of my macro shots using the alien gun that I just made, but now it's covered with some soft foam to diffuse the light and make it more softer. The details are there without being spoiled by harsh light from a bare flash.

Now I'm so into this DIY thing that I made another flash gun in the form of a diffuser using the same materials as the alien gun.


Using the same rectangular container, cut a rectagular shape(as big as the flash head) at the middle, bottom part of it.


After you shaped the cardboard onto the flash head, slot in the other end of the board into the hole. Cut for lines, and expand the board like a flower. Stick the 'petals' using paper tape.


Next, by using the leftover cardboard, I made a small 'hill'(pardon for my noobness, but I really don't know how to call this thing) in front of the flash area. This is to reflect the light from the flash to fill the whole container(at least from my noob theory) resulting a balanced light.


Another look at the 'hill'. I guess you guys can figure it out how I made it. :D


Fill the container with aluminium foil. And cover the 'hill' too. This is my test shot without the soft foam.


Test shot with soft foam attached.

Now for some real life applications.


So what do you think? For me the subject is well-lit without showing some glares and over exposing. Hope that this post of mine will help in your journey for your own diffuser. Next up, I'm thinking of making a ring flash gun. Happy DIY!

Tuesday, August 11, 2009

My first homemade alien gun

What is an alien gun? From what I understand it's a flash diffuser/extender that provides better lighting when doing macro photography and such. I think it's called alien as most of the guns I saw were homemade, and they never looked tidy and neat. Plasters here and there and uncut aluminium foil were part of the gun itself.


How the back looks like.

I initially thought that by just using my f58 and it's built in diffuser will create a good lighting for my macro. But with the new alien gun, the photos are simply better and sometimes amazing to look at. Got the idea from a good friend. So let me share my version of it. Poor man's lighting.

Materials :
1. Manila card or something thicker with shiny surfaces
2. Paper tape
3. Cutter
4. Aluminium foil
5. Thin plastic container.

Procedures :
1. Wrap the paper/manila card around the flash head to secure it with paper tape so that it will be easy for you to insert or detach the alien gun.
2. By using a cutter, cut a rectangular shape at the plastic container at one of it's wide side. Cut it to fit the end of the manila paper nicely inside.
3. Slide in the end of the manila card into the cut area of the container, and make 4 small cuts on the top of the manila card.
4. Expand the end of the manila card(just like a flower shape) and stick in onto the inner part of the container using paper tape.
5. Cover the whole inner part of the container with aluminium foil and cut a hole around the manila card to allow light to enter.
6. Now you have a table lamp lookalike alien gun.


The inner part under the aluminium foil. See the cut areas of the manila card? It's to hold the card in place.


The hole to make way for light.


Table lamp!


I intend to cover the container with tissue to make the light softer but didn't find any suitable one so I leave it like that for now. The result?

Previous macro attempt with f58's built in diffuser.


Scattered light everywhere.


Alien gun attempt.


Even my subject is suprised with it!


Better looking macro shots.

Try yours now!